Personal Access Tokens
Personal Access Tokens (PATs) let you authenticate with the MaestroHub API without using your password. They are ideal for publishing data to UNS topics from external systems, querying pipeline execution results, integrating with SCADA/MES/ERP platforms, and any scenario where you need programmatic access to the platform.
Navigating to Personal Access Tokens
Personal Access Tokens are managed from your profile's Security tab. To get there:
Step 1 — Open your profile. Click your user name at the bottom of the left sidebar to navigate to your Profile Settings page.

Step 2 — Go to the Security tab. On the Profile Settings page, select the Security tab. The bottom section of this tab displays your Personal Access Tokens list along with a Create Token button.

Token List
The token table shows all tokens you have created, including active, expired, and revoked ones.
| Column | Description |
|---|---|
| Name | The descriptive name you assigned to the token. |
| Scopes | Color-coded badges showing the permissions granted to the token, grouped by feature area. |
| Created | The date the token was created. |
| Last Used | The date the token was last used for authentication, or "Never" if it has not been used. |
| Expires | The expiration date of the token. |
| Status | Current state: Active, Expired, or Revoked. |
Creating a Token
- On the Security tab, click the Create Token button in the Personal Access Tokens section.
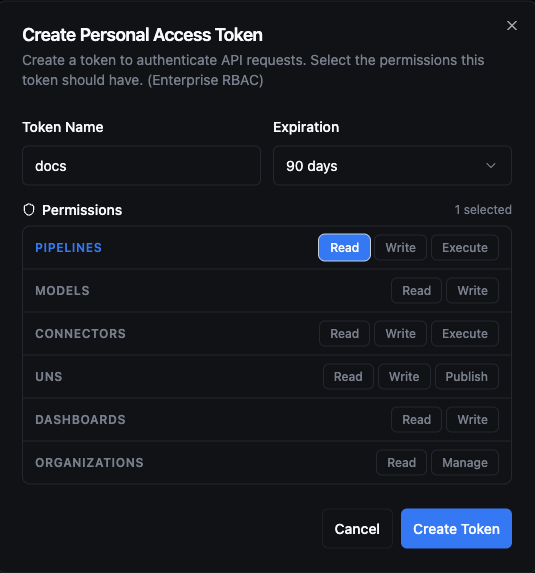
- Enter a Token Name (max 255 characters). Use a descriptive name that identifies the purpose — for example, "ERP Data Sync" or "UNS Topic Publisher".
- Select an Expiration period from the dropdown: 30 days, 90 days (default), 180 days, or 1 year.
- If RBAC is enabled, select the Permissions you want to grant. Scopes are organized by group (Pipelines, Models, Connectors, UNS, Dashboards, Organizations). You can toggle individual permissions or click a group name to select all scopes in that group. A counter in the top-right corner shows how many permissions are currently selected.
- Click Create Token.
After the token is created, MaestroHub displays the generated access token in a copyable text field.
The token value is displayed only once. Copy it immediately and store it in a secure location. Once you close this dialog, the token cannot be retrieved again — you would need to create a new one.
Scopes
When RBAC is enabled, you can assign specific permissions to your tokens. You can only grant scopes that your own account has — the scope selector reflects your current role assignments.
For the full list of available scopes, see Available Scopes.
When RBAC is not enabled, tokens are created without scope restrictions — they inherit the full access level of your account. An informational banner on the creation form indicates this.
Using a Token
Include the token in the Authorization header of your HTTP requests:
curl -H "Authorization: Bearer <your-token>" \
  -H "X-Organization-ID: <your-organization-id>" \
  https://your-instance.example.com/api/v1/engine/pipelines
The platform validates the token on every request by checking:
- Signature — The JWT signature is verified against the server's signing key.
- Expiration — The token must not be past its expiry time.
- Revocation — The token must not have been revoked.
- Scopes — The requested action must be covered by at least one of the token's scopes (when RBAC is enabled).
Revoking a Token
To revoke a token, click the Revoke action on the token row and confirm in the dialog.
- Revocation is immediate — any application using the token loses access right away.
- Revocation is permanent — a revoked token cannot be reactivated. Create a new token if needed.
- Revoked tokens remain visible in your token list with a
Revokedstatus badge.
Limits and Constraints
| Constraint | Value |
|---|---|
| Maximum active tokens per user | 50 |
| Maximum token name length | 255 characters |
| Maximum token lifetime | 1 year (365 days) |