OAuth2 Clients
OAuth2 Clients allow you to register external applications — web apps, single-page applications, mobile apps, and backend services — that authenticate with MaestroHub through standard OAuth2/OpenID Connect flows. This is the recommended approach when building integrations that need to act on behalf of users or operate as autonomous services.
OAuth2 Clients are managed from System Management → API Clients. Only users with the System Administrator role can create and manage clients.
Client List
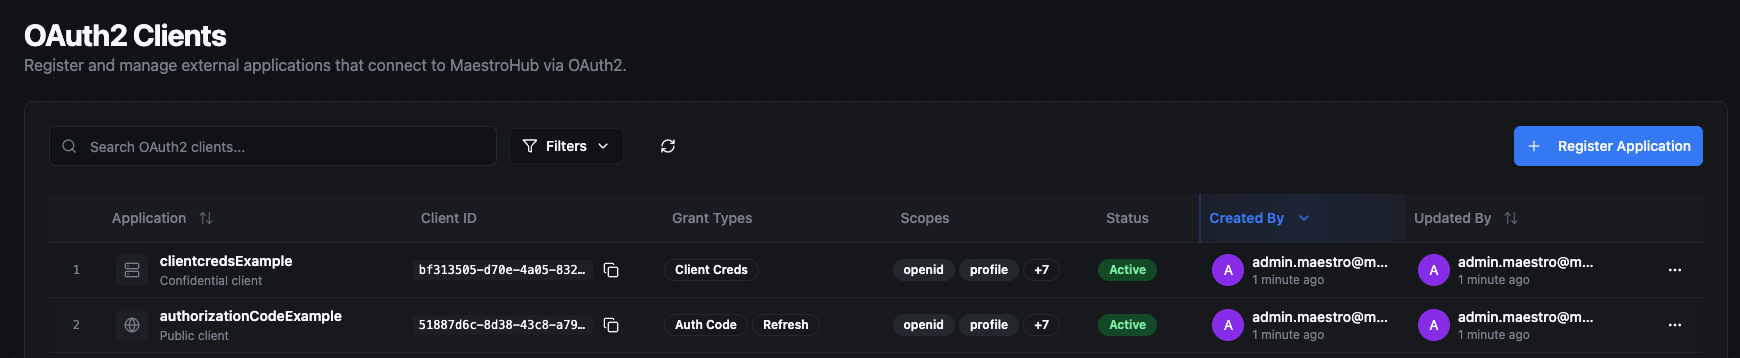
The client list shows all registered OAuth2 applications in your organization.
| Column | Description |
|---|---|
| Application | Client name with an icon indicating type (globe for public, server for confidential) and description. |
| Client ID | The unique identifier for the client (copyable). |
| Grant Types | Badges showing the configured grant types: Auth Code, Client Creds, Refresh. |
| Scopes | The first two allowed scopes as badges, with a "+N" indicator if more exist. |
| Status | Active or Disabled. |
| Created By | The user who registered the client, with a timestamp. |
| Updated By | The user who last modified the client, with a timestamp. |
Use the controls above the table to filter by status (All, Active, Disabled) or search by name, client ID, or description. Sort by name, created date, or updated date.
Actions Menu
Each client row provides the following actions:
| Action | Description |
|---|---|
| View Details | Open the client detail view. |
| Enable / Disable | Toggle the client status. Disabled clients cannot obtain new tokens, but existing tokens remain valid until they expire. |
| Copy Client ID | Copy the client ID to your clipboard. |
| Delete | Permanently delete the client. A confirmation dialog warns about the downstream impact. |
Registering a New Client
Click Register Application to open the creation form. The form is organized into sections.
Basic Information
| Field | Type | Required | Description |
|---|---|---|---|
| Application Name | Text | Yes | Display name for the client (1–100 characters). Shown on the user consent screen. |
| Description | Textarea | No | Optional note about the application's purpose (max 500 characters). |
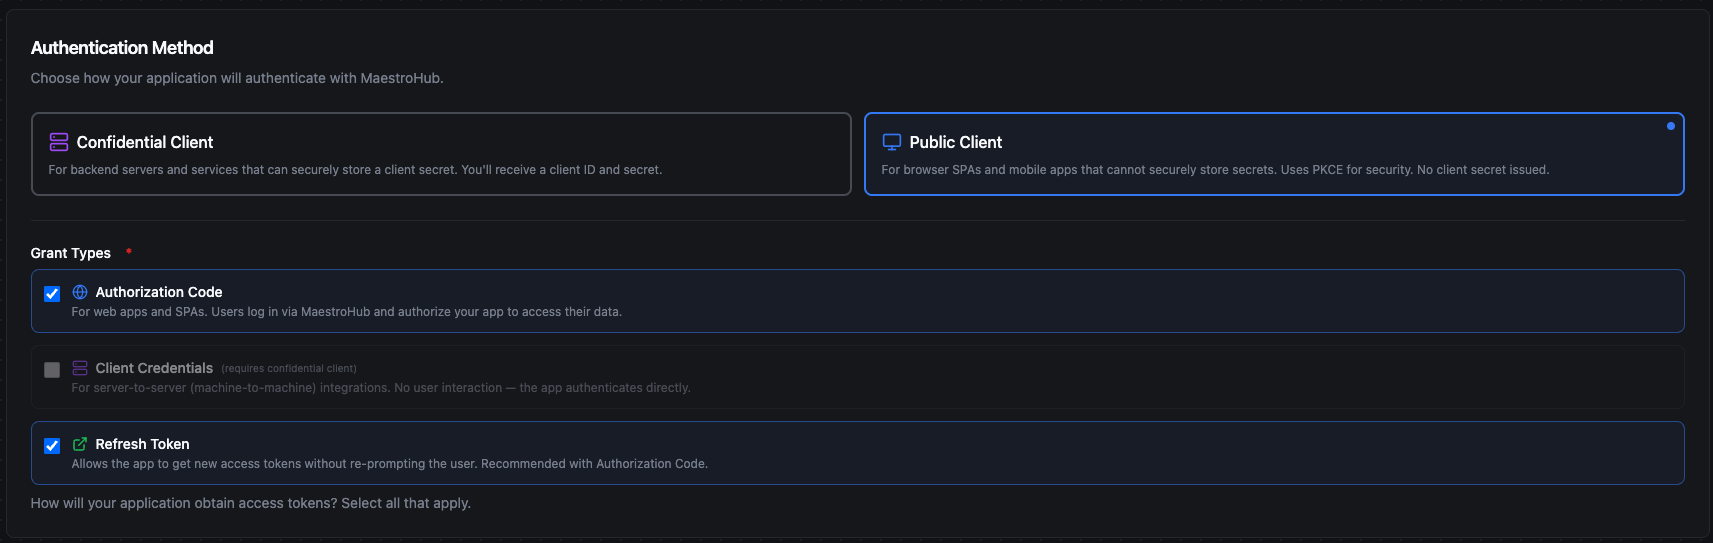
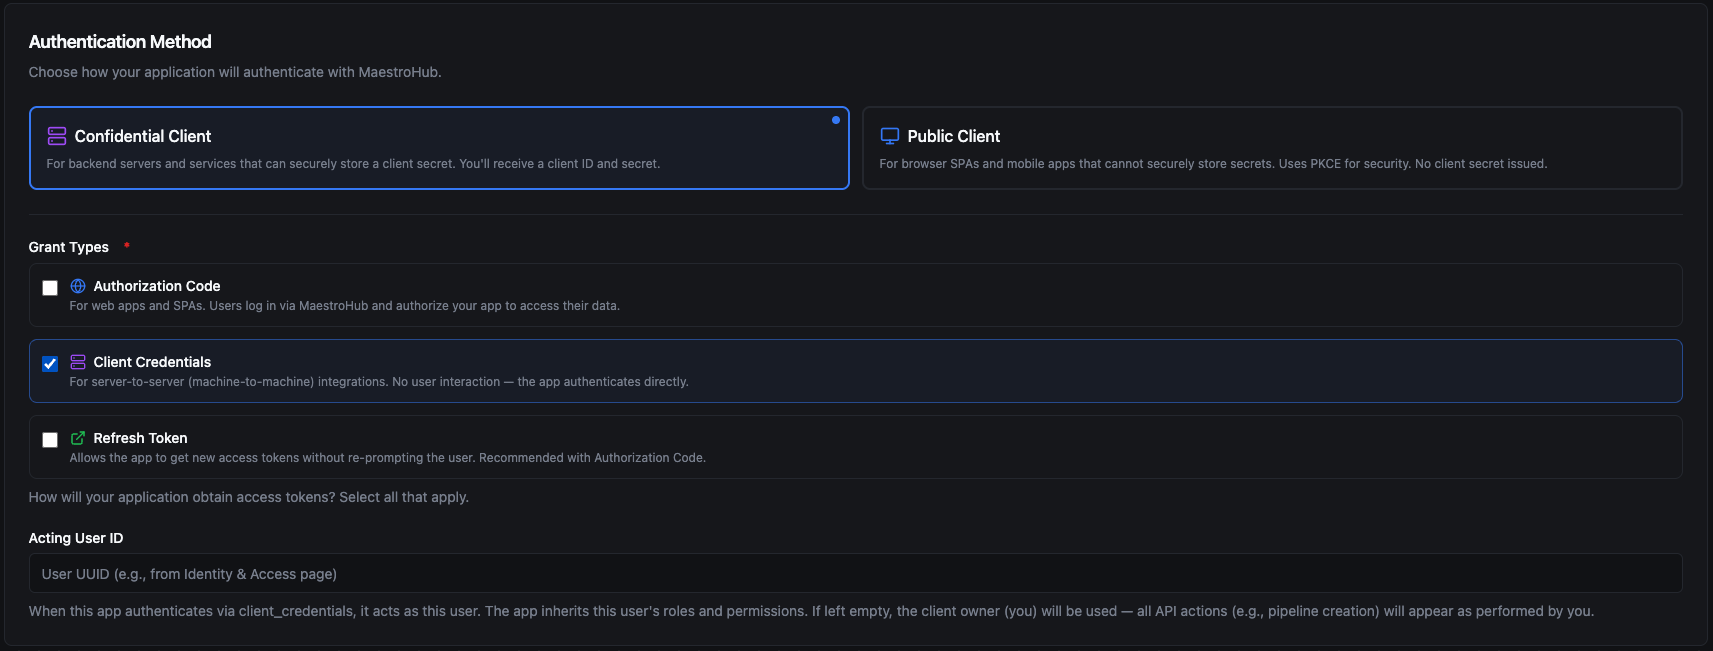
Authentication Method
Choose the client type based on where the application runs and whether it can safely store a secret. This cannot be changed after creation.
| Client Type | Secret Issued | Description |
|---|---|---|
| Confidential Client | Yes | The application runs in an environment where the client secret can be stored securely and is never exposed to end users. |
| Public Client | No | The application runs in an environment where a secret cannot be kept safe. Authentication relies on PKCE instead of a client secret. |
When to use Confidential Client:
- Backend services running on your own servers — for example, an MES system that syncs production orders with MaestroHub, or an ERP backend that periodically reads pipeline execution results.
- Server-side web applications where the source code and configuration are not accessible to end users.
- Any integration where you can store the client secret in a secure location such as environment variables or a secrets vault.
When to use Public Client:
- Browser-based single-page applications (SPAs) — for example, a custom operations dashboard built with React that runs entirely in the user's browser.
- Mobile or desktop applications distributed to end users where the compiled code could be inspected or decompiled.
- Any application where the client secret would be embedded in code that users can access.
If you are unsure, ask yourself: "Can I guarantee the secret will never be visible to an end user?" If the answer is yes, use Confidential. If the answer is no — or if the application runs in a browser or on a user's device — use Public.

Grant Types
Select which OAuth2 flows the client can use. Grant types cannot be changed after creation.
| Grant Type | Description | Confidential | Public |
|---|---|---|---|
| Authorization Code | Users log in via MaestroHub and authorize your application. Requires redirect URIs. | Yes | Yes |
| Client Credentials | Server-to-server authentication with no user interaction. The application authenticates directly with its client ID and secret. | Yes | No |
| Refresh Token | Allows the application to obtain new access tokens without re-prompting the user. | Yes (auto-included with Authorization Code) | Optional |
Acting User (Client Credentials only)
When the Client Credentials grant is selected, an optional Acting User ID field appears. This determines which user identity the service authenticates as:
- If set, the application acts as the specified user and inherits that user's roles and permissions.
- If left empty, the application defaults to acting as the user who created the client.
To find a user's ID, navigate to Identity & Access → Users, click the actions menu (⋯) on the desired user row, and select Copy User ID.
Redirect URIs
Required when the Authorization Code grant is selected. These are the URLs where MaestroHub redirects users after they authorize the application.
- Register each URI individually using the input field.
- URIs must match exactly what the application sends in the OAuth2 authorization request.
- Use
http://localhost:*for local development; usehttps://for production. - Multiple URIs are supported — add one for each environment or callback path your application uses.
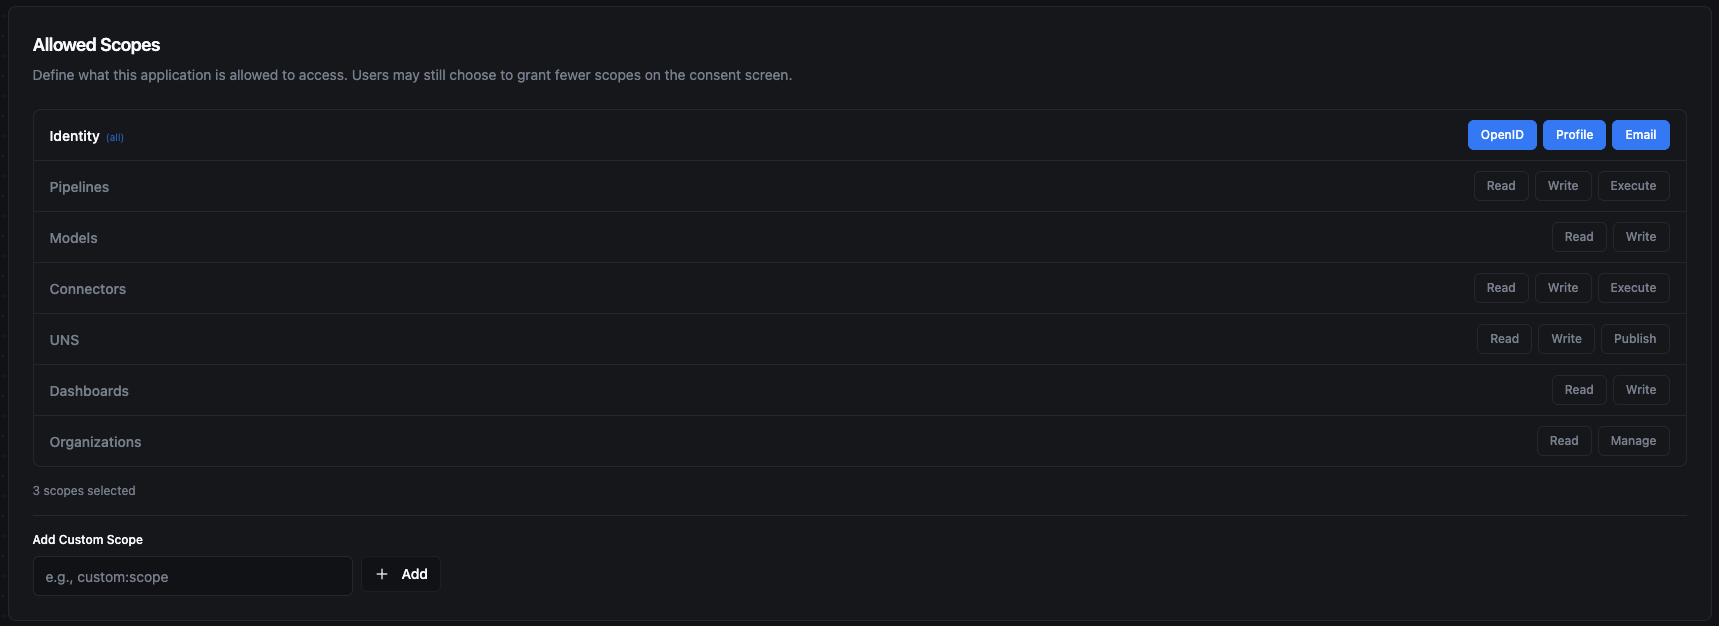
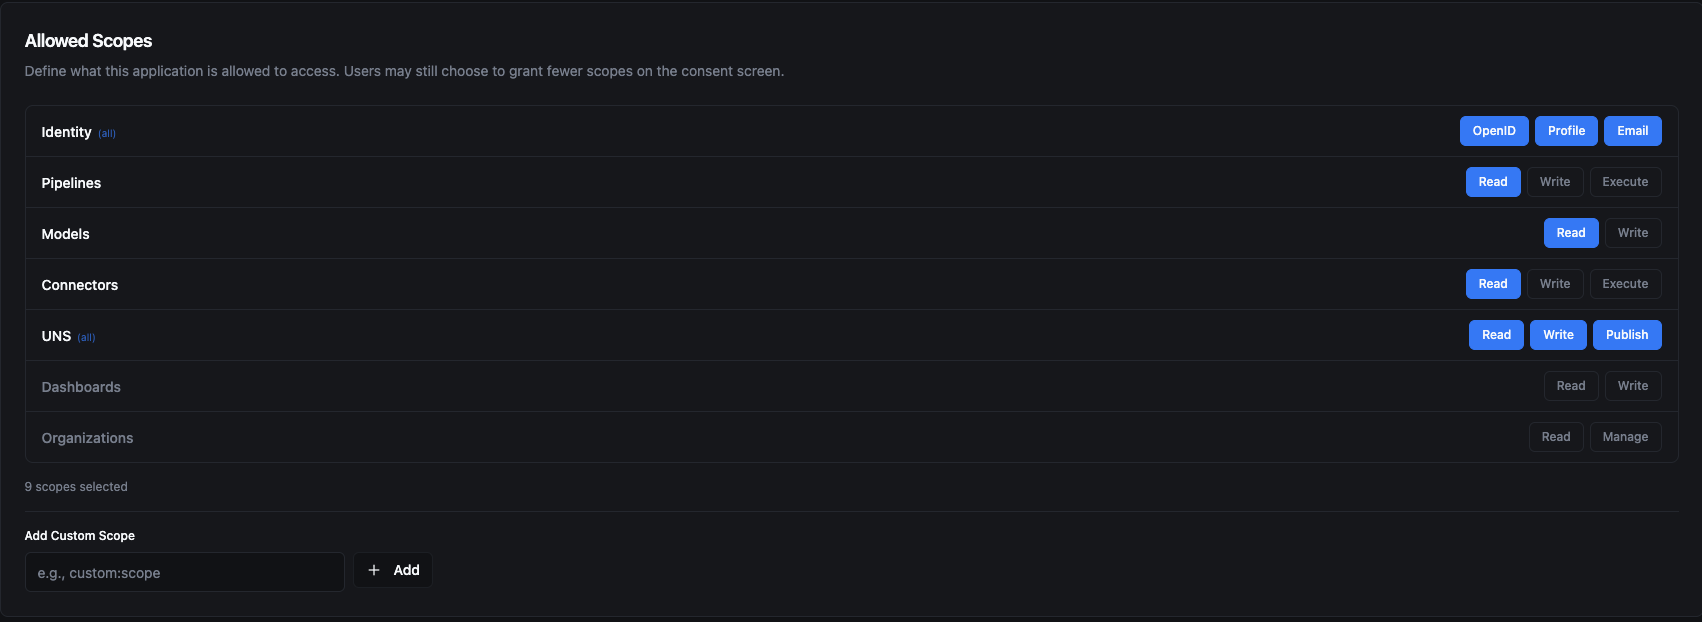
Scopes
Select the permissions the client is allowed to request. Scopes are organized into three categories:
- OIDC Scopes — Always available (
openid,profile,email). Used to access the user's identity information. - RBAC Scopes — Available when RBAC is enabled. For the full list, see Available Scopes.
- Custom Scopes — You can add custom scope strings for application-specific needs. Enter the scope name and click Add.
The scopes configured on the client define the maximum set of permissions it can request. During the Authorization Code flow, users may choose to grant a subset of these scopes on the consent screen.
OAuth2 Flows
Below are two end-to-end examples that walk through the most common grant types. Each example shows how to register the client in MaestroHub and how the application uses it to obtain an access token.
Authorization Code
The Authorization Code flow is designed for applications where a user is present and needs to log in. The application redirects the user to MaestroHub, the user authenticates and approves the requested permissions, and MaestroHub redirects back with an authorization code that the application exchanges for an access token.
The result: Each user logs in with their own MaestroHub credentials. The access token represents that specific user's identity and permissions — different users see different data based on their roles.
Example: Custom Operations Dashboard
Imagine you are building a browser-based operations dashboard where plant operators monitor real-time UNS topic data, view pipeline statuses, and check connector health. Since the application runs entirely in the user's browser, it cannot store a secret safely — so you register it as a Public Client.
Step 1 — Register the client. Navigate to System Management → API Clients and click Register Application. Select Public Client as the client type and check Authorization Code and Refresh Token as the grant types. Note that Client Credentials is disabled for public clients.
Step 2 — Configure redirect URIs. Add the URLs where your dashboard will receive the authorization code after the user logs in. Register both your production URL and a localhost address for development.

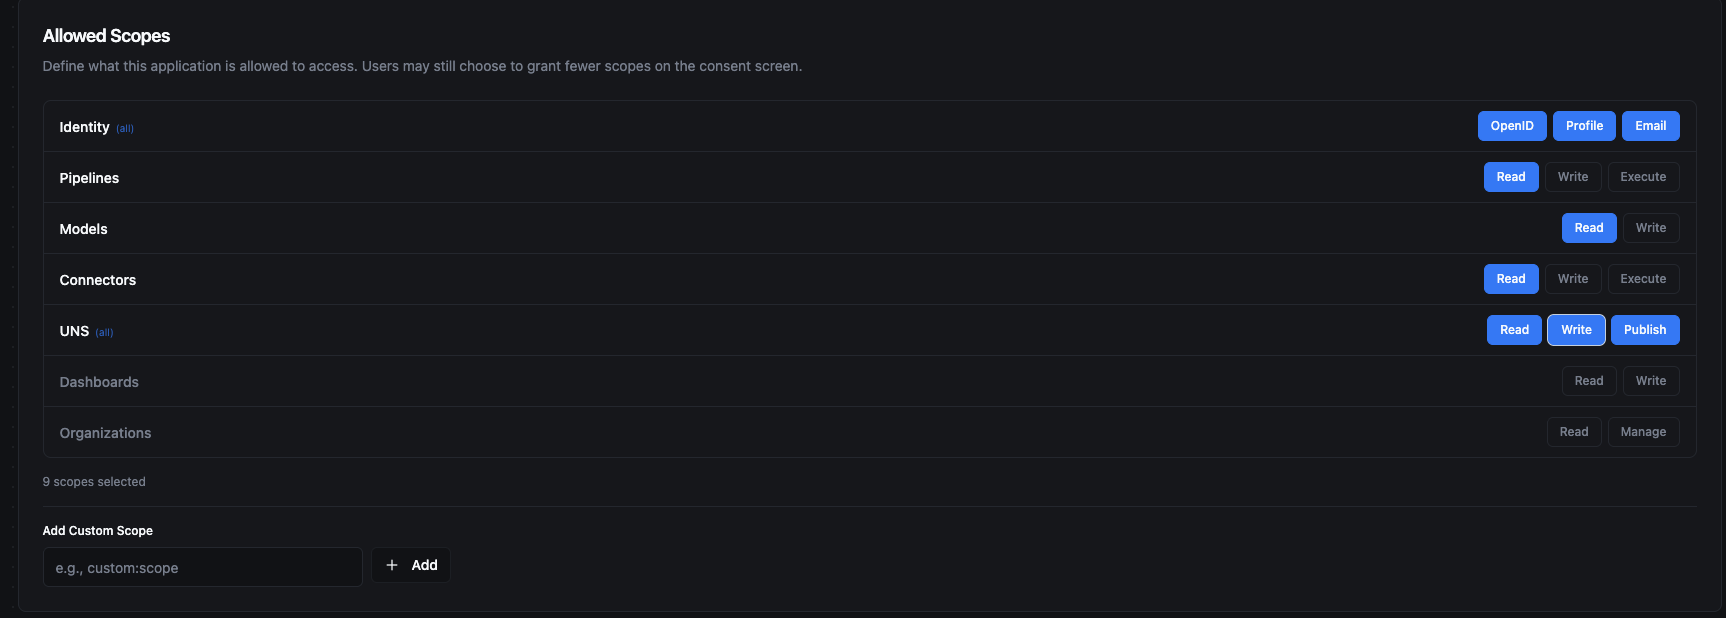
Step 3 — Select allowed scopes. Grant the scopes your dashboard needs. In this example, the dashboard needs to read pipelines and models, read connector statuses, and have full access to UNS topics (read, write, publish). OIDC identity scopes (OpenID, Profile, Email) are included to identify the logged-in user.
Step 4 — Integrate in your application. Configure your OAuth2 library with the client ID and the following MaestroHub endpoints:
| Endpoint | URL |
|---|---|
| Authorization | /api/v1/oauth2/authorize |
| Token | /api/v1/oauth2/token |
The flow works as follows: your dashboard redirects the operator to the MaestroHub login page. After the operator logs in and approves the requested permissions on the consent screen, MaestroHub redirects back to your registered redirect URI with an access token. Your application uses this token to call the MaestroHub API on behalf of the logged-in operator.
Since Refresh Token is enabled, your application can obtain new access tokens automatically when they expire — without prompting the operator to log in again.
Client Credentials
The Client Credentials flow is designed for machine-to-machine integrations where no user is present. The application authenticates directly with its client ID and secret — there is no login screen or consent prompt.
The result: The application acts as a designated service user. All API actions are performed under that user's identity and permissions. This is ideal for autonomous background processes that run without human interaction.
Example: ERP Production Data Sync
Imagine you have an ERP system that needs to periodically push production order data to UNS topics and read pipeline execution results from MaestroHub. The ERP runs on your own server, so it can safely store a client secret — you register it as a Confidential Client.
Step 1 — Register the client. Navigate to System Management → API Clients and click Register Application. Select Confidential Client and check Client Credentials as the grant type. Optionally set an Acting User ID — this is the MaestroHub user the ERP will act as. If left empty, it defaults to the user who created the client.
Step 2 — Select allowed scopes. Grant the scopes your ERP needs. In this example, the ERP needs to read pipelines and models, read connector statuses, and have full access to UNS topics for publishing production data.
Step 3 — Save the client credentials. After clicking Create, the Application Registered dialog appears with your Client ID and Client Secret. Use the copy buttons to save both values immediately. The dialog also lists the next steps for integrating with your application: the authorization endpoint (/api/v1/oauth2/authorize) and the token endpoint (/api/v1/oauth2/token).
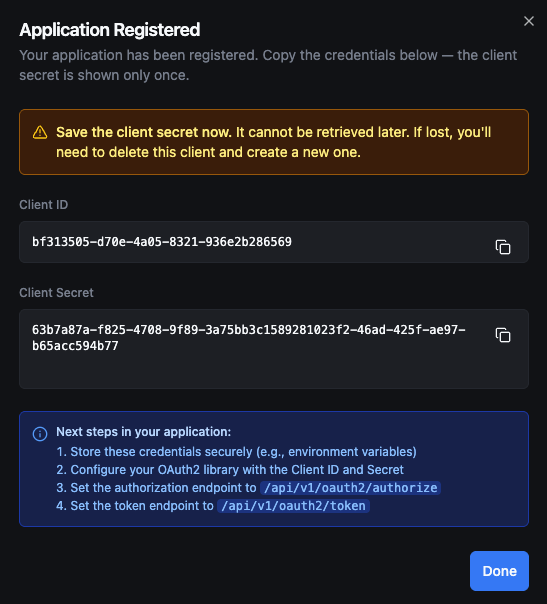
The client secret is displayed only once in this dialog. It cannot be retrieved later — the secret is stored as a hash and the plaintext is never kept. If you lose the secret, you must delete the client and create a new one.
Step 4 — Integrate in your application. Configure your ERP's HTTP client with the client ID, client secret, and the token endpoint (/api/v1/oauth2/token). The ERP authenticates directly with these credentials — no browser or user interaction is needed. MaestroHub returns an access token that the ERP includes in subsequent API requests.
When the access token expires, the ERP simply requests a new one with the same client credentials. All API actions performed with this token appear in audit logs as the Acting User configured on the client.
Managing Clients
After registering your clients, you can manage them from the OAuth2 Clients list. The list shows all registered applications with their client type, grant types, scopes, and status at a glance.
Editing a Client
Open the client detail view and click Edit. You can update the following fields:
- Application name and description
- Redirect URIs
- Allowed scopes
- Acting User ID (for Client Credentials)
Grant types, client type (public/confidential), and response types cannot be changed after creation. If you need to change these, delete the client and create a new one.
Enabling and Disabling
Toggle the client status from the actions menu or the detail view. When a client is disabled:
- New token requests are rejected.
- Existing tokens remain valid until they expire.
- The client configuration is preserved and can be re-enabled at any time.
Deleting a Client
Delete a client from the actions menu. A confirmation dialog requires you to acknowledge the action. Deletion is permanent — all associated tokens and consent records are invalidated.
Discovery Endpoints
MaestroHub exposes standard OpenID Connect discovery endpoints that OAuth2 libraries use for automatic configuration:
| Endpoint | Description |
|---|---|
GET /.well-known/openid-configuration | OAuth2/OIDC server metadata — lists all endpoints, supported grant types, and scopes. |
GET /.well-known/jwks.json | Public keys for verifying token signatures. |
POST /api/v1/oauth2/introspect | Check whether a token is active and retrieve its metadata. |
POST /api/v1/oauth2/revoke | Revoke an access or refresh token. |
GET /api/v1/oauth2/userinfo | Retrieve the authenticated user's profile information. |