Profile Management
The Profile page lets you view and manage your personal account settings. Access it by clicking your avatar in the top-right corner of the application and selecting Profile.
The page is organized into four tabs: General, Appearance, Security, and Activity.
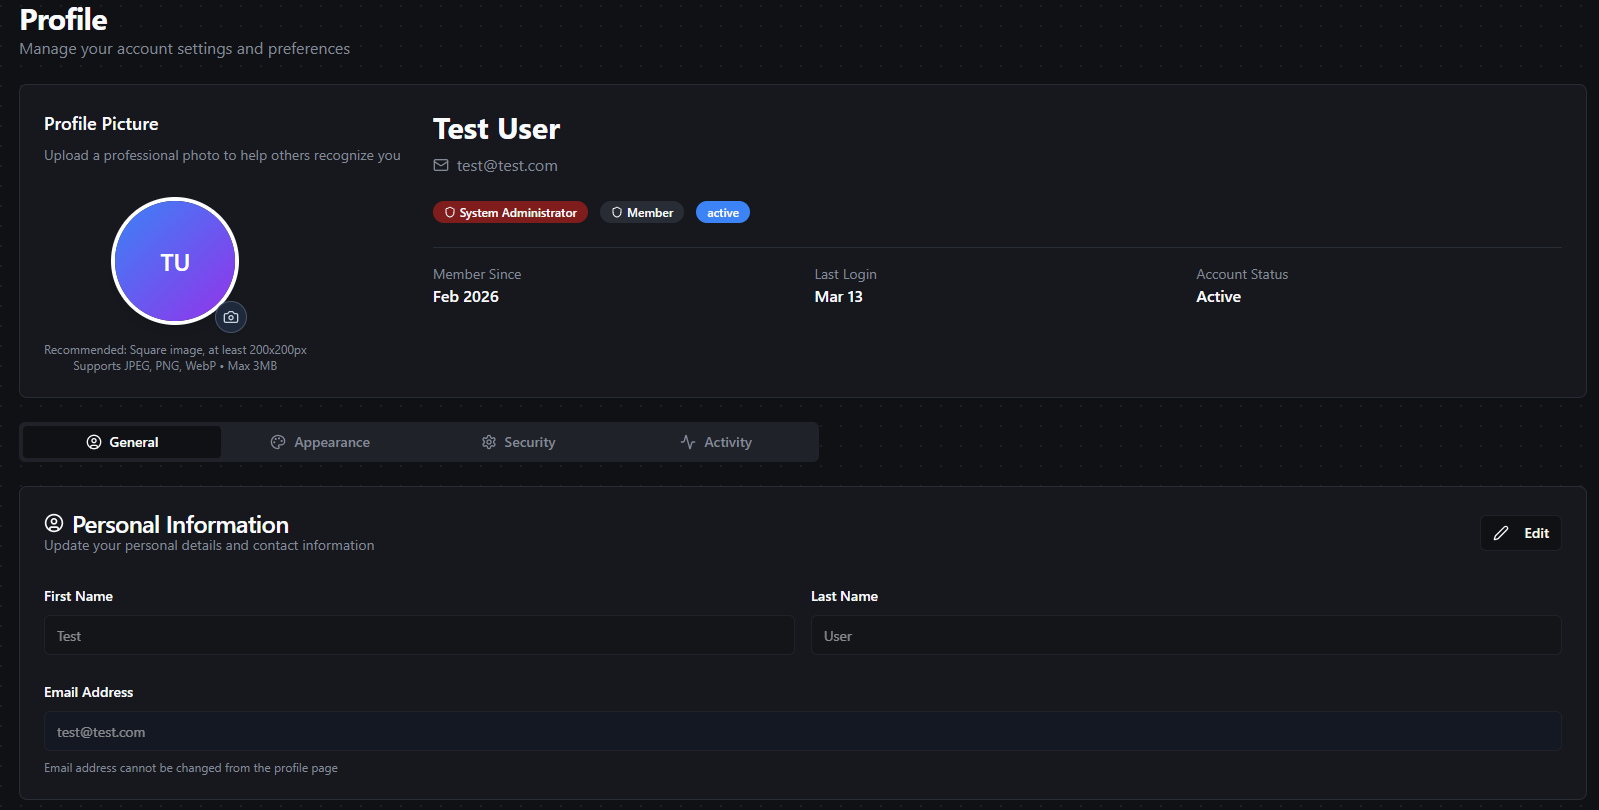
Profile page with header, role badges, and tab navigation
Profile Header
The header section appears at the top of the page and displays your key account information at a glance:
| Element | Description |
|---|---|
| Profile Picture | Your avatar image. Click to upload a new picture or remove the existing one. |
| Full Name | Your first and last name. |
| The email address associated with your account. | |
| Role Badges | Your assigned roles (visible when RBAC is enabled). |
| Account Status | Your current account status (e.g., Active). |
| Member Since | The date your account was created. |
| Last Login | The date and time of your most recent sign-in. |
Uploading a Profile Picture
- Click on your avatar or the upload area in the header.
- Select an image file from your device (JPEG, PNG, or WebP).
- The picture updates immediately after upload.
To remove your profile picture, click the delete option on the avatar. Your initials will be displayed instead.
General Tab
The General tab displays your basic profile information and allows you to update your name.
| Field | Editable | Description |
|---|---|---|
| First Name | Yes | Your first name. |
| Last Name | Yes | Your last name. |
| No | Your email address. This is set at account creation and cannot be changed. |
Editing Your Profile
- Click the Edit button to enable the form fields.
- Update your First Name or Last Name.
- Click Save Changes to apply your updates, or Cancel to discard them.
Your email address is read-only and cannot be modified. If you need to change your email, contact your system administrator.
Appearance Tab
The Appearance tab lets you customize the look and feel of the application.
Theme
Switch between Light and Dark mode to suit your preference. Your selection is saved automatically and persists across sessions.
Full-Width Layout
Toggle the Full-Width Layout switch to expand the application content to use the full width of your browser window. When disabled, content is displayed in a centered, contained layout.
Snow Effect
A decorative snow animation that overlays the application.
| Control | Description |
|---|---|
| Enabled | Toggle the snow effect on or off. |
| Quantity | Adjust the number of snowflakes using the slider (5–250). Only visible when the effect is enabled. |
Security Tab
The Security tab provides two features: changing your password and managing personal access tokens.
Changing Your Password
To update your password:
- Enter your Current Password.
- Enter a New Password. A strength indicator will display feedback as you type.
- Enter the new password again in the Confirm New Password field.
- Click Change Password.
- Confirm the action in the dialog that appears.
New passwords must meet the following requirements:
| Requirement | Default |
|---|---|
| Minimum length | 8 characters |
| Uppercase letter | Required |
| Lowercase letter | Required |
| Number | Required |
| Special character | Optional |
The strength indicator rates your password as Weak, Fair, Good, or Strong based on length, character variety, and complexity.
Choose a password that is at least 12 characters long and includes a mix of uppercase letters, lowercase letters, numbers, and special characters for the best security.
Personal Access Tokens
Personal Access Tokens (PATs) allow you to authenticate with the MaestroHub API without using your password. They are useful for CI/CD pipelines, scripts, and third-party integrations.
The token table displays the following information for each token:
| Column | Description |
|---|---|
| Name | The name you assigned to the token. |
| Scopes | Color-coded badges showing the permissions granted to the token. |
| Created | The date the token was created. |
| Last Used | The date the token was last used for authentication. |
| Expires | The expiration date of the token. |
| Status | Current state: Active, Expired, or Revoked. |
Creating a Token
- Click Create Token to open the creation dialog.
- Enter a Token Name (max 255 characters) — use a descriptive name like "CI/CD Pipeline" or "Monitoring Script".
- Select an Expiration period: 30 days, 90 days, 180 days, or 1 year.
- If RBAC is enabled, select the Permissions you want to grant to the token. Scopes are organized by group and you can select individual permissions or toggle an entire group.
- Click Create Token.
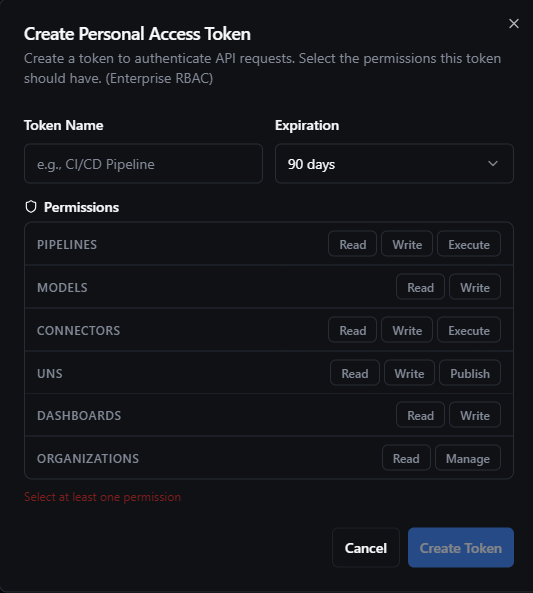
Token creation form with scope selection
After creation, the token value is displayed only once. Copy it immediately and store it in a secure location. You will not be able to view the token value again.

Copy the token value — it will not be shown again
Available Scopes
When RBAC is enabled, you can assign specific permissions to your tokens. The available scopes depend on the roles assigned to your account — you can only grant permissions that you already have.
| Group | Scope | Description |
|---|---|---|
| Pipelines | Read | View pipelines and execution history |
| Write | Create, edit, and delete pipelines | |
| Execute | Run, test, and retry pipeline executions | |
| Models | Read | View data models and field definitions |
| Write | Create, edit, and delete models | |
| Connectors | Read | View connections, functions, and configurations |
| Write | Create, edit, and delete connections | |
| Execute | Start, stop, and test connections; execute functions | |
| UNS Topics | Read | View UNS topics and data |
| Write | Create, edit, and delete topics | |
| Publish | Publish data to topics | |
| Dashboards | Read | View dashboards and widgets |
| Write | Create, edit, and delete dashboards | |
| Organizations | Read | View organization settings |
| Manage | Update settings and manage maintenance mode |
When RBAC is not enabled, tokens are created without scope restrictions — they inherit the full access level of your account.
Revoking a Token
To revoke a token, click the Revoke action on the token row and confirm in the dialog. Revoked tokens are immediately invalidated and can no longer be used for authentication.
Limits
- You can have a maximum of 50 active tokens at any time.
- Token expiration cannot exceed 1 year.
Activity Tab
The Activity tab provides a read-only summary of your account activity.
| Field | Description |
|---|---|
| Account Created | The date and time your account was created. |
| Last Updated | The date and time your profile was last modified. |
| Last Login | The date and time of your most recent sign-in. |
| User ID | Your unique system identifier. |